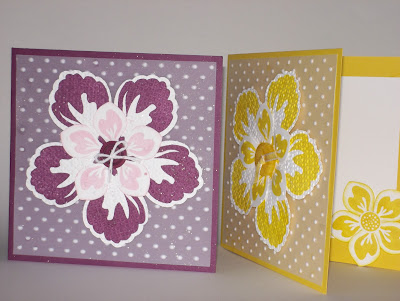
As my Blossom Petals Builder punch was still handy, I fished out my Build a Blossom stamp set and Rich Razzleberry and Pretty in Pink inks to create this design - it was one of the projects we made last week. I used one or two other bits as well of course, like white vellum which was embossed using Perfect Polka Dots embossing folder, a designer button with white bakers twine bow and the whole thing lightly sprayed with champagne mist shimmer paint. We also used the Square Lattice embossing folder to emboss the large petals. Also in Daffodil Yellow ;)
It can be tricky attaching vellum to your card as the glue will show, however, if you're very careful you can put glue just on the embossed areas then it won't be visible on the front. You can just about see where the glue spread a little beyond the embossed dot - left edge of the Rich Razzelberry card. I might stick a small butterfly there to hide it.
26 July 2012
25 July 2012
Faux silk blossom
This card was born when I had a play with the faux silk technique in different colours. The Blossom Petals Builder punch happened to be within reach so there you are. The green background (Certainly Celery I think) is the same technique as yesterday's post except I drew a squiggly line around this one to create a frame. I used the gorgeous Shimmery White as the base card. You can see the shimmer even though my photo taking skills leave a lot to be desired. I'd like to blame the camera but I think it's probably me. Anyways, you get the idea. Oh yes, the bee is from Nature Walk stamp set - cute.
24 July 2012
Sail Away
Another one for the guys. My ladies made this one in class last week. The background is achieved very simply by inking a clear mount block then 'stamp' directly on to the card. I used Baja Breeze here on Whisper White card which is layered on Black card. The boat was inked in Basic Black and stamped on the Baja Breeze background. I stamped a second image, this time on designer paper (First Edition Speciality used here), then I cut out just the sails and glued it over the sails of the main image - otherwise known as paper piecing. The birds is a stamp from Up, Up & Away stamp set which is in the current summer mini catalogue.
I always finish off the inside of my cards, and this one is no exception ;)
I always finish off the inside of my cards, and this one is no exception ;)
7 July 2012
Motorbikes for the guys
I had forgotten about these cards which I made last year!! The Square Lattice embossing folder is perfect for a background and the partially embossed corners add interest to the topper.
The motorbike is heat embossed in black embossing powder then coloured in Tangerine Tango to match the cardstock. I added Crystal Effects to the mirrors, 'metalwork' and coloured in areas of the motorbike.
This motorbike was done in the same way as above except it's in Pacific Point. The Whisper White background however was done with the crimper. Cut your background card to size, fold the four corners to the middle then pass through the crimper. Open out the folded corners and there you have it - very effective.
6 July 2012
Elegant Bird
A quick post today. At last I had a chance to use this gorgeous new Elegant Bird die and I couldn't resist combining it with the beautiful Bordering on Romance stamp Set, in the same colours as before. I used the Perfect Polka Dots folder to emboss the body of the bird and finished off with a crystal for her eye.
Subscribe to:
Posts (Atom)


